
|
|

|
|
|
|
Welcome to the Australian Ford Forums forum. You are currently viewing our boards as a guest which gives you limited access to view most discussions and inserts advertising. By joining our free community you will have access to post topics, communicate privately with other members, respond to polls, upload content and access many other special features without post based advertising banners. Registration is simple and absolutely free so please, join our community today! If you have any problems with the registration process or your account login, please contact us. Please Note: All new registrations go through a manual approval queue to keep spammers out. This is checked twice each day so there will be a delay before your registration is activated. |
|
|||||||
| OzECruisers General Discussions E/N/D vehicles General Discussion ONLY. NO TECH THREADS |
 |
|
|
Thread Tools | Display Modes |
 04-03-2007, 11:25 AM
|
#1 | ||
|
FF.Com.Au Hardcore
Join Date: Apr 2005
Posts: 664
|
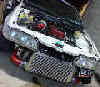
Hi people, seeing the amount of T5 conversions going on, and the lack of a tech document, I thought I would run through my conversion, which was started yesterday, and will be mostly finished today. Part 1 is remove the auto (this installment) Part 2 is install the T5 (later tonight) and Part 3 is the finishing touches (shifter boot, electronics, etc).
Part 1 (this one) is removal of the auto, part 2 is the installation of the manual, and getting it driveable. Part 3 covers the finishing touches, like killing that thermofan and stopping the fault codes. So here goes Part 1: Removal of Auto Step 1: Make workspace. This is important. Working on grass is crap, and dirt is worse. The only acceptable surface is hard, flat, and dent proof. Concrete. Ideally you will have more space than this, but this is the only spot I had to work with. Space behind the car is unimportant, as the EF has such a large rear overhang you can fit a jack under there when you touch park it to a wall. Space in front of the car is handy, but the sides are most important. Which is what I havent got much of here. SWEEP THE FLOOR. It's really annoying trying to work in dust and dog hair, don't even try. Get plenty of rags. You may not need them if you have more of a clue than me, and are quick with the drain pan, but have them handy. Old bed sheets are great for spills of the calibre I can pump out.  Step 2: Position the car. Make sure you have enough room on at least one side to slide the gearbox out (and back in, with the manual). Jack the car up. 400mm from ground to whatever ford calls the chassis rails is a nice workable height, but go higher if possible. If you have a hoist for use (even if its a carton a day), use it. If you do that, get a large gearbox jack (telescopic jack, huge, goes really high), or two strong mates. BTR's are the heaviest gearbox I have had to carry (with the torque converter in anyway). This is a good time to assemble your goodies. My list is: 1 T5 1 Clutch/Flywheel assembly 1 Clutch pedal 1 Clutch pedal pin 1 Clutch Cable 1 spigot bearing 6 flywheel bolts 1 pedal box (just for reference) 1 Spare inspection plate  Step 3. Remove the gearbox accessories. Start on the inside of the car, lest you get grease on everything. Start by removing the flip up panel around the radio, then the trim that goes around all the gauges and buttons. There are two clips that hold it in after the screws are removed, these are near the clock/trip computer panel, so don't worry, just pull lightly around that area. Dont forget to disconnect the buttons (this is a great time to install the factory aerial switch, its just an on/off button that holds its state. good for killing fuel pumps or arming nitrous/shift kits without looking suss). The panel that has your window switches (below drink holder) only has to be removed if you have a button on it, as there is nothing important underneath. The gearshift handle can be removed, the nut on the bottom is only a locknut, undo it half a turn, and the gearshift can come off (like a screw, it has its own thread). The surround can be (gently) pried off with a screwdriver. Dont forget about the power/economy switch. Around this area there are four screws holding the front of the console it, and there are two inside the compartment, on the floor. The console can now come up and back, unless you have a light in the back of it. You will have to figure out how to remove that (shouldnt be any harder than the gearshift surround was though). I prefer to leave the shifter in Drive, as it leaves the gear position sensor in the correct spot (more on that later). Remove the four screws holding the shifter to the floor. Dont pull on it yet. Now you can get underneath the car and marvel at how well your oil leaks have prevented rust. Now undo the bolt connecting the shifter to the (for lack of a better word) relay rod. The other end is held on via an R clip, and takes about three seconds to remove. Now you can remove the shifter from the inside of the car, noting how greasy the seats would have been if you pulled the dash apart after you got under the car  The gear position sensor is that little white thing with two plugs on the passenger side of the trans. After unplugging the wires and undoing the bolts, you can remove the sensor. After doing this, measure the resistance across the two-pin plug while the selector is in the D position. There is no external mark, so what you will have to do (if you have moved it, or started in another gear) is monitor what happens to the 4-pin plug. One of them is reverse, the other is neutral. When the neutral switches, and the reverse doesnt, you are in drive. After this you can remove the trans cooler lines. You will need to hold the larger nut while the smaller nut is being turned. Use a pipe spanner (ring spanner with a slot to get around pipes) if you have one, these can be tight. Unplug the speedo sender unit (just the plug, dont take the sender out yet), and the round multi-pin plug on the side of the auto. Step 4: Remove the Gearbox. Undo the rear cross member outer bolts. You will need the use of a jack. Then lower the gearbox slowly. This is so that you can get at all the bolts. There are two braces going from the block to the bottom of the bell housing, you can get away with removing the bolts to the bel housing and just the forward bolts on the block, they can then rotate downwards. The other two inspection cover bolts can now be removed, and the cover can come off. Now you can remove the starter motor. The bottom bolt is easy, but the top bolt was annoying. After loosening it with a spanner, I used a ¼ drive breaker bar straightened out to take the bolt out. There are four bolts that hold the torque converter onto the flex plate, line them up so that you can undo one with a ratchet while you have a ring spanner on the next one (this is to pull the engine around so you can actually undo the next bolt. If your engine has a decent amount of compression, these bolts should come off easily enough. The bell housing bolts are straightforward enough, but remember that there are two bolts two inches apart up the top on the passenger side. An air ratchet is a great help for the higher one. The gearbox can now be supported by the jack under the oil pan, raised slightly (from the fully down position), and pulled backwards. Lower the jack, and the gearbox is free. I had to jack the front of the car up further (and remove the passenger side jack stand while the car is on the jack) to pull the gearbox out the side. Do NOT get under the car while the jack (with no stands) supports the car, just reach under and pull the box out from the side.  Drop the car back onto the (now replaced) jack stand, and get out your ¾ drive rattle gun and appropriately sized impact socket. I tend to undo the flex plate bolts in a pattern, but it shouldnt matter. The flex plate should need no more than a light tug to remove after the bolts are out.  Thats it for part 1. Part 2 covers installation of the manual, and will be available shortly. cya Ben |
||

|

|
|
04-03-2007, 12:02 PM
|
#2 | ||
|
rofl copter

Join Date: Aug 2005
Location: Werribee
Posts: 3,692
|
just to let u kno, u dont need to take the center console out, u can get the shifter out without taking it out. u can leave the neutral switch in place. an easier way to undo the starter is by cracking the top nut first, then undoing it with ur LEFT hand, it makes like alot easier, then crack the bottum one and square the starter and undo that with ur hand aswell. MAKE SURE u disconnect the battery wen undoing the starter, the main cable for it IS NOT fused and WILL cause a fire in the likly case of it shorting.
__________________
GQ patrol.
.... thats all |
||
|
|
|
|
04-03-2007, 12:08 PM
|
#3 | ||
|
Interceptin'

Join Date: Jan 2005
Location: Melbourne
Posts: 970
|
Awesome stuff BLSTIC! Sticky this!
__________________
'95 EF II Falcon, 'INTERCEPTOR' '72 XA Fairmont Coupe, 'XA Muscle' |
||
|
|
|
|
04-03-2007, 02:06 PM
|
#4 | ||
|
FF.Com.Au Hardcore
Join Date: Apr 2005
Posts: 664
|
Probably, but to be sure (and I have some wiring to do under there) I did anyway.
Yeah when I finish the conversion I will be adding things I forgot (like disconnecting the battery), I'll have one big post that covers the whole lot. It will also be available as a word document with pics if people want it. update: Plugged the manual loom into the auto, removed the auto loom, switched the speedo sender unit, installed the clutch, pedal, and cable. Spigot bearing is in there too. Currently mating the T5 up to the engine, it got stuck and I figure I cant operate the jack and move the gearbox without help. After that the wiring gets plugged in, tailshaft goes in, oil goes in the gearbox, shifter gets put on, starter motor on, and then maybe a victory lap, before I go buy a shifter boot and some resistors on monday. I might cut down the pedal as well. cya Ben |
||
|
|
|
|
04-03-2007, 02:20 PM
|
#5 | ||
|
rofl copter
Join Date: Aug 2005
Location: Werribee
Posts: 3,692
|
hey blstic an easier way to put the box on is do the clutch and make sure its nice and ligned up, then put the bellhousing on, and bolt the box onto that, makes life alot easier :P
__________________
GQ patrol.
.... thats all |
||
|
|
|
|
04-03-2007, 04:21 PM
|
#6 | |||
|
SnortPerformance.com
Join Date: Aug 2005
Location: Brisbane, QLD
Posts: 1,430
|
Quote:
|
|||
|
|
|
|
04-03-2007, 04:27 PM
|
#7 | |||
|
Join Date: Aug 2005
Posts: 2,598
|
Quote:
Cant imagen doing it the other way. |
|||
|
|
|
|
04-03-2007, 08:09 PM
|
#8 | ||
|
Parts bin special

Join Date: Mar 2005
Location: Narre Warren, Vic
Posts: 8,274
|
Nice tutorial. As I've seen a lot of questions about T5 conversions, I agree that this should be stickied. I didn't know what would be required before I had my T5 conversion day. I found this tutorial on the old fordforums site that I found to be pretty handy http://www.fordforums.com/showthread.php?t=33910
__________________
Weekender 1964 US Falcon Futura convertible - Rangoon Red 260 Windsor V8, 4 speed manual, LHD, Electronic ignition, Mustang wheels https://fordforums.com.au/showthread.php?t=11470868 Daily 2010 FG XR50T ute - Lightning Strike 6 speed manual, XR8 bonnet, hardlid, Streetfighter airbox Previous Cars 1990 EAII Fairmont Ghia - Tickford engine, 5 speed, SVO wheels, bodykit, much more 2000 AUII Fairmont - XR wheels, Ghia interior |
||
|
|
|
|
04-03-2007, 08:18 PM
|
#9 | ||
|
Banned
Join Date: Jan 2005
Location: Smoking the bags in a Turbo 6-speed ED!
Posts: 1,208
|
Once you have the box out and the flywheel+clutch+pressure plate+spigot bearing all assembled wedge a block of wood between the crank pulley and the bar that runs across the K frame, so the engine is tilted as far back as you can get it.
This makes it about 11tybillion times easier to fit the gearbox. Personally I don't remove the bellhousing when I convert cars or replace clutches (If I'm just replacing a busted T5 then of course I seperate the box) I either just lie on the ground under the car with my head about level with the back of the engine, manouver the box onto my chest and heave that bugger up there, hands at the bottom of the bellhousing and using my knee on the extension housing. If you have the motor tilted and the clutch plate aligned its not very hard to throw in. You have to be carefull not to drop it on your face though! |
||
|
|
|
|
04-03-2007, 09:00 PM
|
#10 | |||
|
rofl copter
Join Date: Aug 2005
Location: Werribee
Posts: 3,692
|
Quote:
for the sake of 4 bolts, less weight and less awkwardness i think its well worth it. tilting the motor back is a good idea but be carefull were u do it, sumps can be dinted very easily
__________________
GQ patrol.
.... thats all |
|||
|
|
|
|
04-03-2007, 09:22 PM
|
#11 | ||
|
FF.Com.Au Hardcore
Join Date: Apr 2005
Posts: 664
|
Yeah thats the way it was installed. I tried the other way, but after I couldnt line up the clutch, it was abandon. I eventually ended up with someone in the car with their foot on the clutch, while I manuvered the gearbox onto the bellhousing. Slid straight in.
Now its in limp home mode, I'm off to dick smith tomorow to get some man sized resistors that are near enough to the right values to kill the limp home mode. The car drives nice though, light clutch, good response, good shift, just loads of smoke. I am writing part 2 right now. cya Ben |
||
|
|
|
|
04-03-2007, 10:21 PM
|
#12 | |||
|
Banned
Join Date: Jan 2005
Location: Smoking the bags in a Turbo 6-speed ED!
Posts: 1,208
|
Quote:
If there is a mate available I get him to hang off the flywheel to pull the engine up at the front, or just ram the wood in there if I'm by myself. |
|||
|
|
|
|
04-03-2007, 11:05 PM
|
#13 | ||
|
FF.Com.Au Hardcore
Join Date: Apr 2005
Posts: 664
|
Part 2 is written up. Ill post it tomorow arvo when I get home from work and upload the pics.
Cya Ben |
||
|
|
|
|
08-04-2015, 07:33 AM
|
#14 | |||
|
Regular Member

Join Date: Aug 2014
Location: The 'NAKI
Posts: 54
|
Quote:
cheers. 
|
|||
|
|
|
|
20-04-2015, 03:23 PM
|
#15 | |||
|
FF.Com.Au Hardcore
Join Date: Feb 2006
Posts: 584
|
Quote:
in short no. as you cannot unbolt the bellhousing with the trans installed |
|||
|
|
|


 Linear Mode
