
|
|

|
|
|
|
Welcome to the Australian Ford Forums forum. You are currently viewing our boards as a guest which gives you limited access to view most discussions and inserts advertising. By joining our free community you will have access to post topics, communicate privately with other members, respond to polls, upload content and access many other special features without post based advertising banners. Registration is simple and absolutely free so please, join our community today! If you have any problems with the registration process or your account login, please contact us. Please Note: All new registrations go through a manual approval queue to keep spammers out. This is checked twice each day so there will be a delay before your registration is activated. |
|
|||||||
 |
|
|
Thread Tools | Display Modes |
 06-12-2009, 04:01 PM
|
#1 | |||
|
AFF Whore

Join Date: Apr 2009
Location: In between gas stations
Posts: 2,246

|
Grandpa_spec_aus guide to Replacing the Rear hub and Axle in an AU IRS.
Ok well its been a long time coming but I've finally gotten around to putting together a How To guide on removing the rear hub and axle on an AU with IRS. Bear in mind this was done over the course of 2 weeks or so when I had the time between uni and work so a lot of the photos (if not all) were taken at nighttime, my best mate and I slaving away as illustrated below. First things first, you will need: - Socket set with 10mm, 15mm, 18mm and 21mm (deep socket) - Spanners of the same size (or additional socket set, we used a shifter and a multigrip because were cheap) - Car jack stands - Diff jack or other means to lift the car - Hammer (for those stubborn bits) - Phillips head screw driver - Breaker bar (or a long heavy duty screwdriver) - Wheel chocks - A clear space around you to curse freely - Additional options: A helping hand (almost a must), cigarettes, beer, soft drink, chips, music etc. Now that the supplies are gathered we can begin. I have had various people advise to drain the diff oil before doing this however I chose not to and Ive driven roughly 5000ks and not a hitch so far. First off you will need to place wheel chocks under the front tyres to ensure the car does not move. Place the car in Neutral and then take the hand brake off. Loosen the rear wheel nuts off then jack the car up and place it on jack stands, proceed to take the tyre off. Although the image below is hard to make out, we placed the stands just slightly forward of the diff. 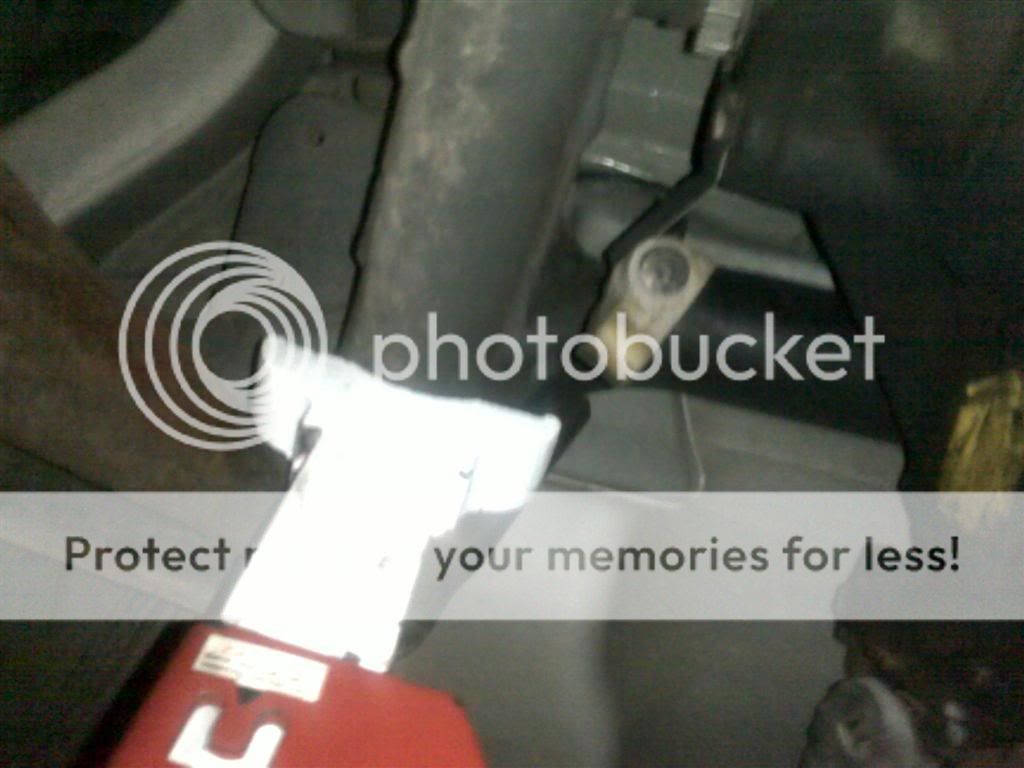 The next step is to take off the brake caliper, which has two 15mm bolts holding it in place from behind. 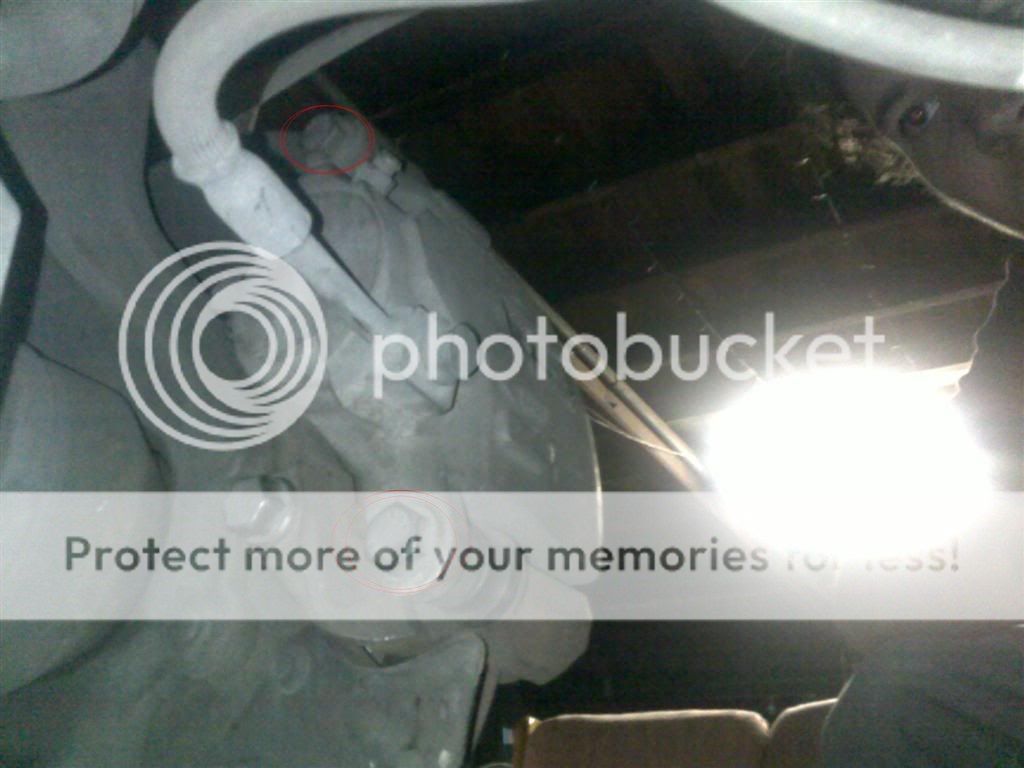 To save hassle we simply zippy tied the caliper up as seen below. This is not recommended, and removing it would be best practice however for now we will ignore this discrepancy. 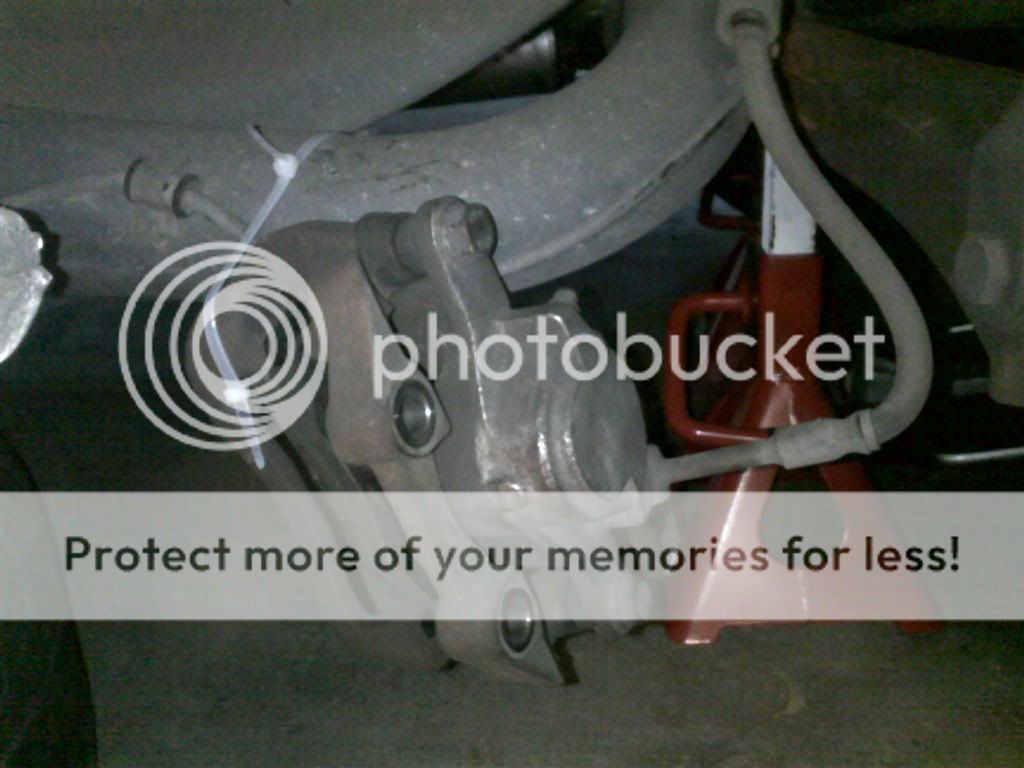 Next we have to remove the handbrake cable. There are other threads on how to do this but a picture is included for reference. We also removed the bracket that was holding it to make things easier. (Phillips head IIRC)  You now need to remove the retaining screws holding the rotor on. These are Phillips head screws and can clearly be seen when looking directly at the rotor. Mine was missing which was a tad worrying however you can get them from Ford for around $3 per screw. Once you have removed these you will need to provide some (gentle) persuasion to remove the rotor from the hub assembly. A tap from behind will see it quickly pop off. (For further assistance see the Useful AU Threads section on removing rotors) Now the fun begins! We used a diff jack to do this but another form of support could also be used. The main thing here is to ensure the hub is being supported.  Using your 18mm socket, loosen off the top bolt and nut using one socket or tool to undo the nut and the other to hold the bolt in place. 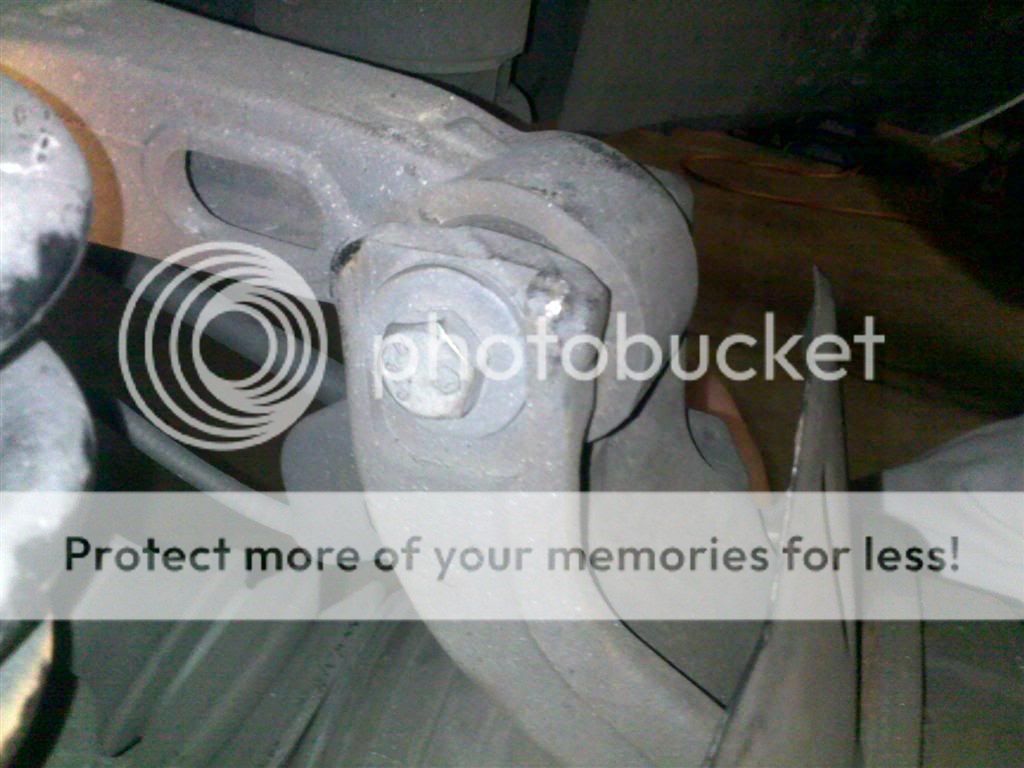 Now using the 21mm socket, loosen off the bottom bolt with the same procedure. It was so seized up that we had to use the pipe from the diff jack to squeeze our socket into for better leverage.  See: Stupidity 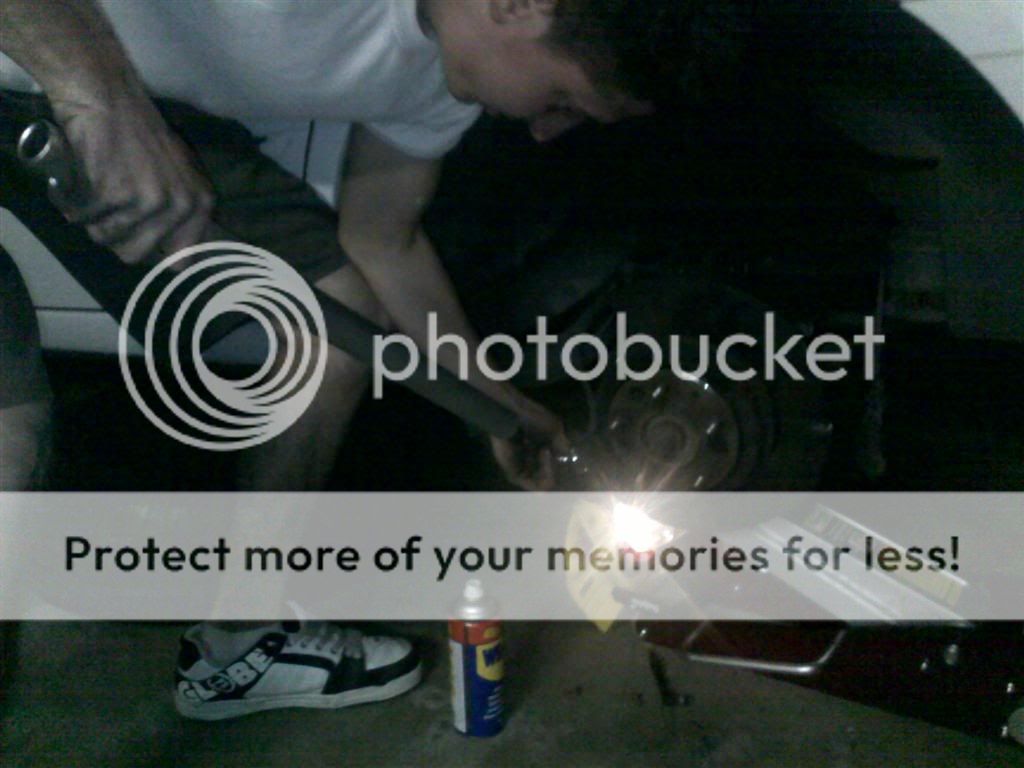 Ensure that these are both only loose at this stage as you do not want to remove them until you have someone ready to take the weight off the hub. With both bolts now loose, remove the nut on the end of the tie rod with a 15mm socket. (Ignore wherever that hand is pointing)  Now you will need to get under the car and follow the axle to the diff where you will see a ring with a bunch of teeth on it, there lies your ABS sensor which will need to be removed with a 10mm socket. Below is a picture of where it is normally mounted, the module will have a wire running off it, take the time to clean the sensor off while youre at it as they get gunked up pretty easily.  Ok so here is the part that gave us the most grief. Undo and remove the top and bottom bolt from the hub and carefully wiggle it away from the upper and lower arms so that it is free, also ensure your tie rod is well out of the way. For this part I held the hub up myself and got my mate to go under the car, then lowered and moved the jack out of the way, however as long as the hub is supported you should be ok doing this by yourself. Place the breaker bar / heavy duty screwdriver between the diff housing and the ABS ring and pull/push so that it is levering the axle away from the car. There is a retaining clip inside that holds on for dear life so ensure to apply a fair bit of pressure but dont break anything! 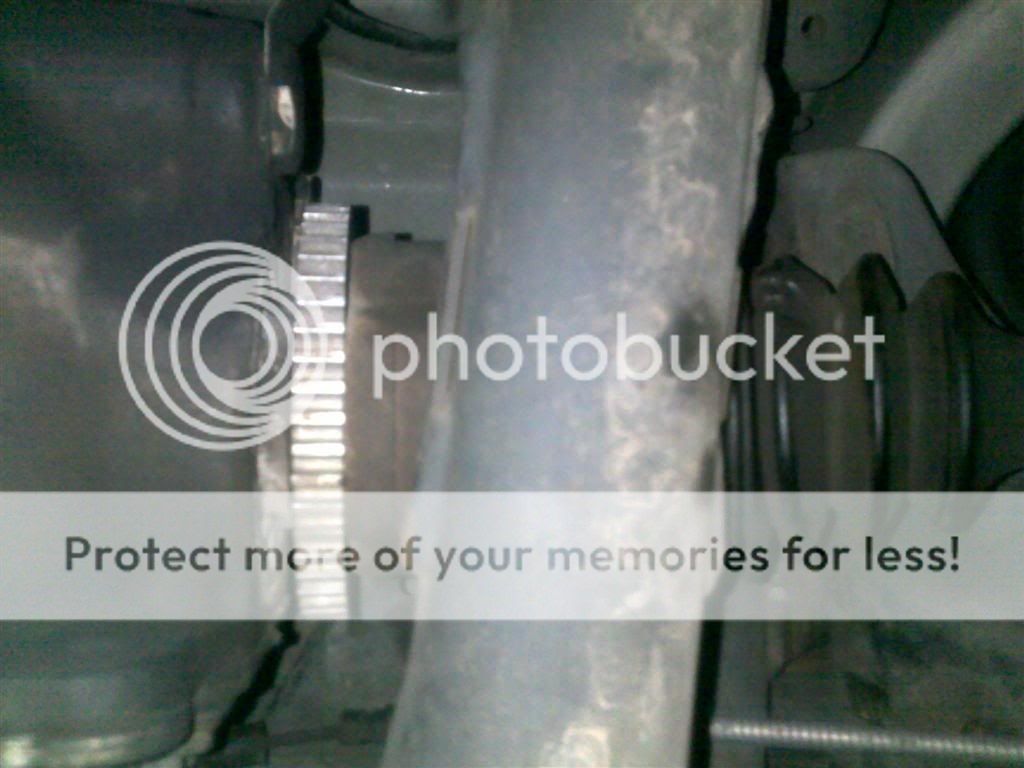 Your axle (if everything goes accordingly) should pop out, and you can now proceed to slide this out gently from the diff. If you are going to leave it for any time plug the hole with a rag of some sort The installation of the new hub and axle is simply a reverse of the above, slide the axle in and make sure you have it all the way in and that it is sitting correctly. Jack up or get your helper to hold the hub up and reattach the upper arm first (do not tighten up yet) so that the hub has some support, then reattach the lower arm (we used the diff jack to help it into place). Replace the ABS sensor you removed. Replace the tie rod and then the handbrake cable. Tighten up the upper and lower bolts from the previous step as well as the tie rod nut. Replace the rotor and ensure to put the retaining screw back into place. Replace brake caliper and ensure screws are done up tight (as one of my bolts fell out and almost caused a major disaster) Replace wheel, jack up car, remove jack stands, lower car, enjoy your beer  : : A major thank you has to be given to the following people: Aufairmontghia MrHardware RG Ronwest Without their help I would have been extremely lost and confused. I would also like to thank the other members of the forum who provided their input. Car was a Sept 1998 Ford AU Fairmont Ghia
__________________
Favorite Quote: Quote:
|
|||

|

|
|
06-12-2009, 04:21 PM
|
#2 | ||
|
All Bran = Regular Member
Join Date: Feb 2006
Location: BrizVegas
Posts: 1,970
|
Bravo!
Well done, mate. A valuable resource. |
||
|
|
|
|
06-12-2009, 06:15 PM
|
#3 | ||
|
Hardcore I6 Enthusiast

Join Date: Jun 2008
Location: Melbourne
Posts: 438
|
Quick recommendation on the great guide, an extraction tool to help remove the drive shafts, as mine were impossible to extract from the hub with a hammer, and the extraction tool almost broke!
|
||
|
|
|
|
06-12-2009, 08:28 PM
|
#4 | ||
|
FF.Com.Au Hardcore
Join Date: Aug 2008
Posts: 1,127
|
Just quickly, there is no need to remove the ABS Sensor. I have done 3 Axle (halfshaft) remove/replace's on my August 1998 XR8 without touching the ABS Sensor.
__________________
GT 335 11.3@124.1mph 383rwkw/513rwhp Forced Performance Tuned |
||
|
|
|
|
06-12-2009, 08:47 PM
|
#5 | |||
|
AFF Whore
Join Date: Apr 2009
Location: In between gas stations
Posts: 2,246
|
Cheers for the info! Thought I'd remove it to be safe as I didn't want to break anything :P
__________________
Favorite Quote: Quote:
|
|||
|
|
|
|
03-03-2011, 05:51 PM
|
#6 | ||
|
FF.Com.Au Hardcore
Join Date: Sep 2006
Posts: 721
|
I've been stuck in the middle of this for almost a week now, i cant undo the lower control arm bolt, I've even gone as far as using a propane torch on it to try free it, no amount of force can get it off, any recomendations?
|
||
|
|
|
|
03-03-2011, 09:25 PM
|
#7 | ||
|
FF.Com.Au Hardcore

Join Date: Dec 2004
Location: Newcastle NSW
Posts: 7,885
|
Get a can of Rostoff made by Wurth. Dissolves rust in seconds. I soaked a XD front lower suspension bolt for days with WD40 that we were belting with a sledge hammer and still couldn't move it. After about a minute after spraying the Rostoff we hit it and it nearly went to the moon! Best penetrating fluid by far
__________________
T3 TL50 #147 Silhouette Auto ESS - Brembos - Last of 3 in T3 spec, only AUIII TL50 ever built -14.2 sec @ 98mph bog stock. Only customer ordered T3 TL50 built, only LWB sedan plated AUIII and the last performance enhanced LWB sedan built by Ford Aust. AUII Fairlane Ghia Sportsman 5.0L in Blue Pearl OWN THE ROAD |
||
|
|
|
|
20-03-2011, 07:13 PM
|
#8 | ||
|
FF.Com.Au Hardcore
Join Date: Sep 2006
Posts: 721
|
I ended up buying a $200 kinchrome socket set and used sheer leverage to force it off
 anyway, i've got the axels out of the diff, i'm about to drop the diff, what do i need to do to drop the diff? I've loosened the 2 bolts at the back of the diff, and i've got the 1 big one at the front of the diff to turn but not sure if its loosening, and it looks like a smaller bolt holding some kind of hose going into one side of the diff and out the other, i guess i have take the bolt off and unplug them? also sockets are too big for the drive train bolts, so i guess i'll have to use spanners, should i undo the drivetrain before or after dropping the diff? anyway, i've got the axels out of the diff, i'm about to drop the diff, what do i need to do to drop the diff? I've loosened the 2 bolts at the back of the diff, and i've got the 1 big one at the front of the diff to turn but not sure if its loosening, and it looks like a smaller bolt holding some kind of hose going into one side of the diff and out the other, i guess i have take the bolt off and unplug them? also sockets are too big for the drive train bolts, so i guess i'll have to use spanners, should i undo the drivetrain before or after dropping the diff?
|
||
|
|
|
|
21-03-2011, 10:15 AM
|
#9 | ||
|
FF.Com.Au Hardcore
Join Date: Dec 2004
Location: Newcastle NSW
Posts: 7,885
|
Rostoff would have been a lot cheaper but at least you own a decent socket set now.
When you say the drivetrain I assume you are referring to the tailshaft? Drop it down first but mark its position relative to the diff flange before you do. Why are you pulling the diff?
__________________
T3 TL50 #147 Silhouette Auto ESS - Brembos - Last of 3 in T3 spec, only AUIII TL50 ever built -14.2 sec @ 98mph bog stock. Only customer ordered T3 TL50 built, only LWB sedan plated AUIII and the last performance enhanced LWB sedan built by Ford Aust. AUII Fairlane Ghia Sportsman 5.0L in Blue Pearl OWN THE ROAD |
||
|
|
|
|
23-03-2011, 02:06 PM
|
#10 | ||
|
FF.Com.Au Hardcore
Join Date: Sep 2006
Posts: 721
|
some 3.89's are going in
it just seems like it wants to fight me the whole way.
|
||
|
|
|
|
24-03-2011, 02:18 PM
|
#11 | ||
|
FF.Com.Au Hardcore
Join Date: Dec 2004
Location: Newcastle NSW
Posts: 7,885
|
To get the diff out you don't need to remove the driveshafts from the hubs.
Just undo the top bush above the hub and with the hub pivoting on the lower bush swing the top out and withdraw the driveshaft from the diff at the same time. Then unbolt the diff from the cradle
__________________
T3 TL50 #147 Silhouette Auto ESS - Brembos - Last of 3 in T3 spec, only AUIII TL50 ever built -14.2 sec @ 98mph bog stock. Only customer ordered T3 TL50 built, only LWB sedan plated AUIII and the last performance enhanced LWB sedan built by Ford Aust. AUII Fairlane Ghia Sportsman 5.0L in Blue Pearl OWN THE ROAD |
||
|
|
|
|
25-03-2011, 09:10 AM
|
#12 | ||
|
FF.Com.Au Hardcore
Join Date: Sep 2006
Posts: 721
|
The diff is dropped, everything is ready to go, all except two bolts connecting the tailshaft to the diff, i got 2 off and one loose, but damn they are hard to turn, looks like they've got some green stuff on the threads, anti seize maybe? will rost off penetrate this?
|
||
|
|
|
|
25-03-2011, 08:46 PM
|
#13 | |||
|
FF.Com.Au Hardcore
Join Date: Dec 2004
Location: Newcastle NSW
Posts: 7,885
|
Quote:
Try a wire brush to clean up the threads
__________________
T3 TL50 #147 Silhouette Auto ESS - Brembos - Last of 3 in T3 spec, only AUIII TL50 ever built -14.2 sec @ 98mph bog stock. Only customer ordered T3 TL50 built, only LWB sedan plated AUIII and the last performance enhanced LWB sedan built by Ford Aust. AUII Fairlane Ghia Sportsman 5.0L in Blue Pearl OWN THE ROAD |
|||
|
|
|
|
07-12-2012, 01:52 PM
|
#14 | ||
|
Regular Member
Join Date: Apr 2011
Posts: 111
|
Hi all
 FORD should definitely be major contributor$ to this forum FORD should definitely be major contributor$ to this forum  . need to replace rear brake pads, so might as well replace my ford au2 Fairmont Ghia 'high performance diff' with an au2 XR6 ' LSD '. . need to replace rear brake pads, so might as well replace my ford au2 Fairmont Ghia 'high performance diff' with an au2 XR6 ' LSD '.  about 230k km less on it about 230k km less on it  Planning to change rubbers, also.. So PLEASE !!! Any extra info relating to procedure, quick steps, ie.. just replacing diff internals ? or do I have to go whole hog ?? like 4 days 5 cartons Planning to change rubbers, also.. So PLEASE !!! Any extra info relating to procedure, quick steps, ie.. just replacing diff internals ? or do I have to go whole hog ?? like 4 days 5 cartons  already replaced transmission, never done IRS diff, sounds pretty straight forward. biggest thanks, merry christmas to all. " keep watching the skies already replaced transmission, never done IRS diff, sounds pretty straight forward. biggest thanks, merry christmas to all. " keep watching the skies  " "
|
||
|
|
|


 Linear Mode
